🛒 Best Price Today on Amazon
Prime members get fast, free shipping on everything above, plus member-only deals. New members get a 30-day free trial — cancel anytime.
- What should you confirm before pulling a switch?
- How do you take off the cap and get the original switch out?
- How do you install and test a replacement switch?
- What should you do when one switch does not work?
- How do you decide whether to swap a switch or fix something else?
- How should you replace a full set without losing track?
- Conclusion
Set the Corsair K65 Plus Wireless to Off, unplug USB, and start with one ordinary key. That is the safest way to learn how to replace Corsair K65 Plus keyboard switches before changing a full set. Use the switch puller on the housing tabs, line up the replacement pins, and test the key before replacing the others.
What should you confirm before pulling a switch?
Verify that the board is the K65 Plus Wireless
Read the complete model name on the keyboard or package. This procedure applies to the Corsair K65 Plus Wireless with hot-swappable mechanical switches.
The K65 family also includes the K65 Pro Mini and K65 RGB Mini, which have different designs. A similar name and a removable keycap do not establish that the switches can be pulled from the board.
A hot-swap socket allows you to lift a switch out of the plate and replace it without opening the case or working on solder. Check the model guide if you bought a different edition or a used keyboard with unknown modifications. On the intended board you should have access to the switch’s clips once the keycap is removed.
If you are changing switches to repair a problem, confirm it first with one normal profile and a supported connection. A key that only fails in a particular title can be mapped differently there. A key that repeats in a simple editor and on another supported connection gives you better reason to test the physical switch.
Choose a compatible mechanical switch
Corsair’s manual specifically documents Cherry MX RGB mechanical replacements. It says some third-party three-pin and five-pin designs may fit, with physical differences affecting compatibility.
Use that stricter guidance when selecting a part. Check the actual housing, the pin positions and the plate fit rather than relying on a description that simply says MX-style.
The ordinary switch uses metal contacts. A center plastic post locates it, and some versions have extra plastic alignment legs.
The difference in locating points is separate from whether the switch uses the correct electrical system. Hall effect, optical, and low-profile families need their own designs and should not be selected merely because the housing or stem looks similar.
Buy or borrow a compatible sample when trying a third-party family. A switch can fit the board and still contact a particular keycap or spread the light differently. Checking one with the cap you intend to use is cheaper than discovering the issue after replacing a full set.
| Task | What you need | What to verify |
|---|---|---|
| Remove a cap | Wire cap puller or the included combination tool | Wires catch opposite corners and the cap lifts straight |
| Remove a switch | Switch-hook end of the included tool or a suitable puller | Both clips disengage before the housing lifts |
| Fit a replacement | A compatible mechanical switch with straight pins | Housing sits level and fully engaged |
| Verify operation | USB data cable and simple input test | One press, one release, and no unexpected repeats |
| Diagnose a bad key | Known-good original switch and a working socket | Failure follows the switch, follows the socket, or changes with settings |
Set out the tools and capture the original layout
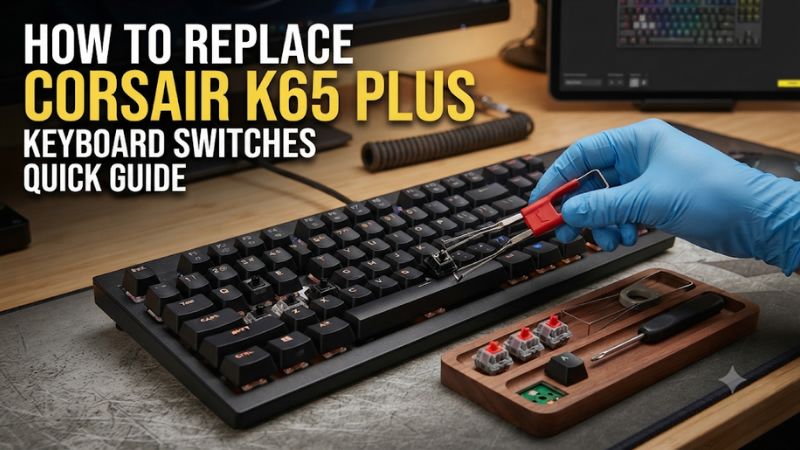
Use a clean, steady surface with light from above or the side. Get the included two-in-one puller if you have it, or a wire cap puller and a separate switch puller.
Put a small tray nearby so pins and caps cannot get mixed with objects on the desk. Keep original switches where you can identify and reuse them.
Take a photo if you are removing several rows. Cap lengths and shapes can change across the keyboard, and rotated legends or the wrong cap profile can create uneven gaps.
Give larger stabilized keys special attention. Leaving Space and other long caps in place for the first trial makes it easier to learn the basic technique.
Choose an ordinary single-width key such as a spare letter or navigation key. Avoid starting with a critical key or a long cap. Test the tool and the replacement on that key before you remove all the originals.
How do you take off the cap and get the original switch out?
Disconnect both USB and wireless power
Move the K65 Plus three-way mode selector to Off and unplug the USB data cable. Corsair’s manual labels Off as the wired setting when USB is connected.
Both steps matter if you want the unit inactive during the swap. Pulling the receiver alone does not switch off a board that is still in a wireless mode.
Press an ordinary key once and confirm the board is no longer sending input or lighting in response. Use a separate mouse or keyboard if you need to interact with the computer. Then set the board flat so pulling upward does not tip it or drag it across the desk.
Keep the disconnected cable where you can reach it for testing. Reconnect only after the switch is fully seated and the cap is installed. Powering down again between changes makes it easier to work carefully without causing accidental input.
Lift the keycap with the wire end
- Place the wires at opposite corners. Corsair’s guide shows why a diagonal approach helps both wires hook under the cap.
- Check the hooks before pulling. Make sure they are under the cap edges and are not caught on a neighboring key or on a switch housing.
- Lift vertically. Keep the tool centered and use steady force. If the cap lifts from only one side, lower it and reseat the tool.
- Set the cap aside in orientation. Keep it with its row or position, especially during a full set change.
A long key can involve stabilizer stems in addition to the central switch. If you need to remove one, work with even support rather than pulling one end hard.
Stop if it feels as though the wire or supporting parts are being dragged upward. Learn the process on a small cap first.
If you want to fix only one key, leave the surrounding caps in place unless they obstruct access to the puller. A cleared neighbor can give you enough room to see both retention tabs. It creates much less reassembly work than removing the whole row.
Release both clips and pull the switch straight up
Look at the switch housing from above. Corsair’s guide shows clips along the top and bottom of the installed switch geometry. Place the hook end under the two tabs, squeeze so the clips release, and lift the switch straight upward with controlled force.
- Re-center a slipping puller. If it slides off a tab or grips only one edge, release the pressure and start again.
- Keep the housing level. If one side rises while the other stays held, set it back down and check the second hook.
- Stop when force increases. Recheck that the hook tips are reaching the retention points. Avoid levering against the plate or the LED.
- Inspect the removed part. Check the pins and clips and keep the original switch for the known-good test.
A firmly retained switch can take a little practice to remove. Improving the tool’s placement is more useful than jerking upward. If you see the plate move, or a switch feels stuck after both clips should have released, stop and seek model-specific guidance before damaging the socket.
How do you install and test a replacement switch?
Match orientation and check both metal contacts
Hold the replacement beside the original and compare the underside. Identify both metal contacts and the plastic locating features.
Match the orientation that lets those parts enter their intended openings. The keycap stem’s shape alone is not enough to tell whether you have rotated the housing correctly.
Check that both contacts are straight before insertion. A fine contact folded sideways can look like an extra edge on the housing.
Set that part aside or use another known-good compatible switch so the first test starts with clean pins. If a contact appears crimped, loose, or likely to break, use another switch.
Look at the empty position on the board in good light. You should see a clear plate opening and the holes below it.
If foreign material is obvious, remove it gently in a way that does not move or scrape the socket. Do not use conductive wire or a pointed metal tool to probe a contact.
Seat the housing without forcing it
- Lower the switch squarely. Start with the locating post and contacts facing the right openings.
- Press from the center. Use even pressure until the housing clips are seated. It should sit level with comparable keys.
- Back out if it stops early. Remove the switch and check orientation, pin straightness, and housing fit. More pressure can fold a pin or damage the socket.
- Reinstall the right cap. Press the cap down over the stem and compare its height and travel with a neighboring key.
If the housing fits with the cap removed yet the key catches after you add the cap, test another compatible cap or inspect the surrounding clearance. Larger caps need both the switch and stabilizers engaged evenly. Binding at the bottom can come from the cap or adjacent keys even when the electrical connection works.
Before reconnecting, tap the unpowered test key a few times. It should return smoothly and sit at a consistent height. If it stays partly depressed or feels tilted, resolve that before you run the operating system test.
Verify press, hold, and release by USB
Reconnect by USB with the selector in Off for the documented wired path. Use a known data cable and a direct port.
Open a plain text editor or a trusted key tester and check an untouched key first. A failure there means you should restore the connection before judging the replacement.
- Tap the changed key slowly. Each separate press should produce the expected input once.
- Hold and release. A tester should show key-down followed by key-up. An editor can repeat a held character normally, so judge repeats separately from a clean tap.
- Try a common combination. Test the key with Shift or with one command relevant to your game.
- Try the usual connection again. Once the wired baseline works, verify the receiver or Bluetooth mode you normally use.
A mouse-dependent game can obscure small mapping problems. Use a basic input test first so you can see whether the keyboard sends the expected event. After that, run an ordinary in-game sequence to confirm your profile and bindings still behave as intended.
What should you do when one switch does not work?
Trace a dead key with one known-good part
Shut the keyboard down again, remove the cap and the replacement, and inspect both contacts. Check whether the new switch was fully seated.
Test the original known-good switch in that socket. If the original works and the new one fails there, try the new switch in a known-good socket only if its pins and housing are undamaged.
When the failure moves with the same switch, replace that part. When both known-good switches fail only in the same position, restore the normal keyboard profile and retest.
If the position still fails, socket damage or another board issue becomes more likely. Document the test before opening the case or making a larger change.
Test adjacent keys while you are there. A single failed position points in a different direction from several keys failing together after the board was moved. If the whole keyboard is unresponsive, check the cable and selector before removing more parts.
Check repeated characters and slow return separately
If the key repeats during distinct taps, compare it with a known-good switch in the same socket. Disable a custom mapping or macro that might deliberately send more than one command. An ordinary held-key repeat is expected in many text editors, so watch what happens when the key comes fully back between individual taps.
Slow return or rubbing can be mechanical. Check the cap’s seating and whether it touches an adjacent row.
If the switch moves freely without the cap and catches only when the cap is installed, look at the cap or stabilizer. If it catches without the cap, compare that switch outside the board with a normal sample.
If the only difference is lighting, check whether the replacement switch transmits light in the same way. An opaque housing or different light path can darken one key while its inputs remain correct. Verify the board’s effect and brightness separately before diagnosing a damaged component.
How do you decide whether to swap a switch or fix something else?
Check whether the same behavior appears on the stock part
Before ordering switch replacements for missed inputs, test the affected key with a direct USB connection and a plain profile. Compare it with one neighboring key under the same conditions.
Write down whether the symptom is silence, a repeated input on one tap, or a rough stroke. Each points to a different test.
If several shortcut positions changed together after you edited an iCUE profile, test a standard keymap before pulling the switches. If one key repeats independently of the rest and the issue follows a suspect switch to another position, replacing that switch is the more direct fix. A working hardware change should survive an ordinary reconnect.
When inspecting an intermittent key, use both slow taps and a series of ordinary quick presses. One successful press by itself gives little evidence that the key is fixed. After you have a plausible replacement, run the same short game or typing task that first revealed the problem.
Swap only the group where you want a different feel
Start with the movement cluster if the goal is a different spring or tactile response under your gaming hand. Try one compatible switch and compare it against the remaining stock positions. If the new key repeatedly actuates under a resting finger, test a different spring weight or keep the original there.
A small group makes it easier to judge sound and return speed in normal use. Keep one familiar reference key beside the new group.
If the reason is a louder space bar, check the stabilizers and cap fit as well. A switch can change some of the sound without addressing movement at either end of a long cap.
Use the board for a few matches before completing a full change. You can always add more replacements once the first group proves useful. This is particularly helpful if stock MLX-style linears are comfortable for ordinary typing but you want a different feel only for a few game controls.
Test clearance and light before ordering the remaining parts
Put your regular cap on the sample and hold the key from several points on its surface. Compare how far it moves and whether it rubs an adjacent cap.
A compatible pin layout can coexist with a keycap and housing combination that feels cramped when installed. A small trial can reveal the issue without requiring you to alter the keyboard.
Then set a single RGB color and look at the changed position from your normal seat. Decide whether a different housing changes the light enough to bother you.
The sample has passed the mechanical and electrical tests only once it travels normally and repeatedly sends the expected key. Treat appearance as a separate decision.
How should you replace a full set without losing track?
Work in small groups and maintain a baseline
After one switch passes, disconnect the board and work on a row or a small group. Set the original switches aside in the same order if you plan to reuse them. Keep the keys around the dial, left Shift, and arrow cluster organized, since compact layouts give some caps sizes that may not match nearby positions.
Test a group before starting the next one. When all the replacements go in at once, a dead key could be a damaged contact, an incomplete seating, or an existing setting. A group test tells you when the problem appeared and leaves enough original switches to use for diagnosis.
You can also mix the original MLX switches with compatible replacements where useful. Different weights on movement and typing keys can be intentional. Record the locations so you can return to a consistent layout if the new feel starts causing accidental presses.
Do a final pass with the layout and lighting you use
Run your hands across the rows and check that cap heights, legends, and action match the original photo. Then try Space, both Shifts, and the arrow cluster. Test a quick input sequence using your preferred connection and close any tester before you rely on the board for a game.
Try your usual lighting after the electrical checks, particularly if you picked switches with a different housing. If you use a custom iCUE profile, load it only after confirming normal input. Check that the board works with the profile as well as without it.
Keep a few original switches and the puller after the job. They give you a known reference if an individual replacement develops a problem. You can often recover a familiar feel or diagnose the cause without replacing the full set again.
For a heavily used key, check a few natural off-center taps after the first straight-down test. A part that works only when pressed at the center needs a fit check. Make sure the cap sits fully on the stem and that the switch clips hold both sides flat before using it in a game.
Conclusion
Turn the K65 Plus Wireless off, unplug it, and remove the cap and switch vertically with the right ends of the puller. Start with one compatible mechanical replacement, align its pins, and test its press and release by USB before replacing the rest. If a key fails, use the original known-good switch to tell a bad replacement from a board or mapping problem.