🛒 Best Price Today on Amazon
Prime members get fast, free shipping on everything above, plus member-only deals. New members get a 30-day free trial — cancel anytime.
- How do you confirm that your MSI Vector can take another SSD?
- What should you do before removing the bottom cover?
- How do you install the second M.2 NVMe SSD?
- How do you bring the new SSD online in Windows?
- What should you check if the new SSD is missing?
- How do you verify the upgrade before moving your whole library?
- Conclusion
Start by checking your MSI Vector’s full model number and confirming that a compatible M.2 slot is empty. For readers asking how to add a second SSD to MSI Vector laptop configurations, the safest plan is to leave the boot SSD in place, fit a compatible NVMe drive, and initialize only the new blank drive in Windows.
How do you confirm that your MSI Vector can take another SSD?
Find the full model and the storage specification
Read the model from the bottom label, packaging, or receipt, then confirm it in Windows System Information if needed. Write down the entire name, including the suffix.
A Vector 16 HX A14V and a Vector 16 HX AI A2XW are separate families. Vector GP68 HX systems also come in multiple generations.
Open the manufacturer’s specification for your exact system and read Storage Capability or Storage Slot. Count the slots and note their protocol and generation. Then verify how many drives are already installed.
A specification listing two slots describes the board’s capability. A machine can ship with one drive, two drives, or a different regional configuration.
Disk Management can show how many physical disks Windows currently sees, but its list does not label an empty connector or prove which slot contains the boot SSD. The board layout or the exact model’s service guidance is the useful reference before deciding which connector to use.
| Example MSI family | Storage capability on the referenced product specification | What still needs confirming |
|---|---|---|
| Vector 16 HX A14V | One M.2 NVMe PCIe Gen4 slot and one Gen5-compatible slot | Occupied position, physical fit, and cooling arrangement |
| Vector 16 HX AI A2XW | One M.2 NVMe PCIe Gen4 slot and one Gen5-compatible slot | Exact regional SKU, screw or retainer, and available slot |
| Vector GP68 HX 13V | One M.2 NVMe PCIe Gen4 slot and one Gen5-compatible slot | Board layout and whether the vacant slot is appropriate |
| Any other Vector configuration | Use its own storage specification | Slot count, protocol, supported length, clearance, and occupancy |
These examples show why you should identify the exact computer before ordering. Do not use a table from a similar Vector to identify screws or the battery connector. Even machines that list the same storage generations can lay out the parts differently.
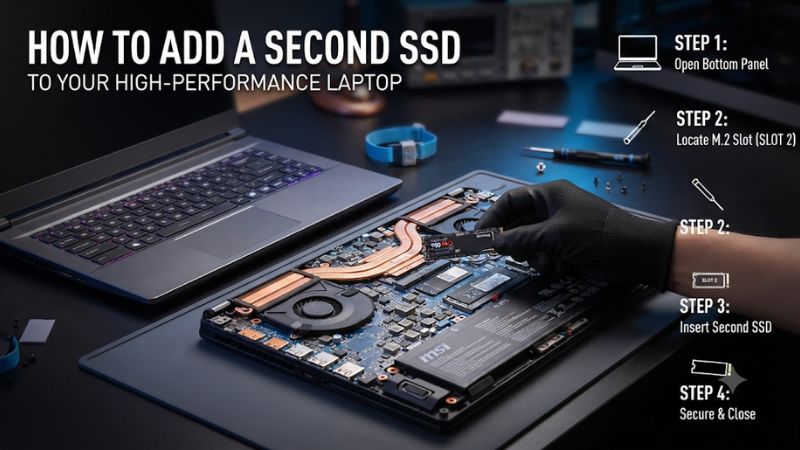
Match the drive to the vacant connector
Check the interface and size listed for the vacant SSD position. M.2 refers to the form factor.
It does not make an M.2 SATA drive suitable for a slot documented for PCIe NVMe. A specification such as M.2 2280, when confirmed for the slot, refers to a board about 22 mm wide and 80 mm long.
Check the amount of space above and below the drive. Many laptop slots have limited clearance and use a thin pad or shield. A tall desktop heatsink may interfere with the cover.
Confirm support for a double-sided drive if that is what you are considering. Where clearance is unclear, ask MSI about the exact model and chosen SSD rather than forcing a part into place.
Choose a drive for the slot you have. A higher-generation SSD does not make a slower slot operate at the higher generation.
Many compatible drives can negotiate a slower link, but you should verify the drive and slot together. For a secondary game library, capacity and physical fit are often more useful than paying for a link speed the empty slot cannot deliver.
Identify which existing disk starts Windows
In Windows, open Disk Management and note the current physical disks and the drive letter of your Windows installation. Record their capacities and, where possible, model names from device details.
A single physical disk can contain several partitions. Count the disk entries rather than counting letters such as C and D.
Make a backup of files you cannot replace. If BitLocker or Device Encryption is enabled, make sure you can retrieve the recovery key separately from the laptop before opening it.
A hardware or boot change can trigger a recovery prompt. You should be able to access the key from another device if needed.
For a simple capacity expansion, plan to add the drive as a separate data disk. Leave the existing SSD and its partitions undisturbed. A blank game drive can go into the open slot and be prepared in Windows without cloning the operating system.
What should you do before removing the bottom cover?
Check the opening procedure and the parts you need
Find model-specific service or disassembly guidance that shows the screws, clips, battery, and SSDs. MSI’s storage guidance can help identify compatible slots, and regional support can confirm whether a service center is the appropriate route for your exact unit. If you cannot identify the screw layout or the way a cover releases, verify it before prying.
Set out a screwdriver that fits the heads, a plastic opening tool, a tray for screws, and the approved SSD and mounting parts. Check whether the vacant slot has a screw or retainer.
Use the proper fastener for that standoff. A chassis screw may be longer and can damage the mount or board.
If the model uses an SSD shield or factory thermal pad, identify where it goes before touching it. Keep the arrangement intact and use only the appropriate thickness. A pad that presses too hard or a cover that will not lie flat means the fit needs further checking.
Shut the laptop down completely
- Finish the backup. Close active games and saves. Make sure the necessary files and recovery information are available separately.
- Shut down Windows. Turn the laptop fully off instead of leaving it asleep. Unplug the power adapter and remove other cables or accessories.
- Prepare a clean work area. Use a stable surface and take ordinary static-control precautions. Keep the SSD in its protective packaging until installation.
- Organize the screws. Record their locations as you remove them. Keep differently sized screws separate so each returns to its original position.
If a particular screw or cover area resists, stop and recheck your model’s procedure. A laptop cover can have hooks that release in a particular order. Forcing a corner can break a clip or bend the cover without opening it any faster.
Access the interior and isolate the battery as documented
Use a plastic opening tool where the exact guide shows a safe approach. Lift the cover only after the screws and clips have been released.
Confirm the position of the SSDs and the internal battery connector before moving any part. Take a photo of the area if it helps you restore the original arrangement.
Where the model’s instructions call for disconnecting the internal battery, use the documented method before touching the SSD area. Avoid pulling on wires or levering a connector whose latch and direction you cannot identify. If access depends on moving parts you are unfamiliar with, use the appropriate service route.
If you see a damaged or swollen battery, stop and arrange service. The job is adding the storage device.
There is no reason to press on the battery or remove adjacent assemblies to gain leverage. Use the verified SSD location rather than moving the existing boot drive to see where the connector is.
How do you install the second M.2 NVMe SSD?
Check the empty slot, standoff, and shield
Compare the interior with your model-specific diagram. Find the vacant SSD connector and its mounting point.
A connector that resembles M.2 elsewhere in the laptop may be for a different device. Confirm that the standoff lines up with the end of your SSD and that the intended drive clears the surrounding parts.
Remove the appropriate retainer or screw, and move the SSD cover or shield only if the model documentation calls for it. Keep the screw close at hand. Your goal is to fit the new SSD without lifting the factory boot drive or disturbing its shield and thermal pad.
Hold the SSD by its edges. Compare the connector notch with the slot and confirm the direction before inserting.
A wrong angle or key should stop the installation. More pressure cannot make an incompatible SSD fit the connector.
Seat the SSD and secure it without bending the board
- Align the notch. Place the drive at the approach angle shown for the connector and slide it in gently until seated. Avoid scraping or touching its contacts.
- Lower the free end. Bring it toward the correct standoff. If it does not naturally line up, reseat the drive before proceeding.
- Install the proper fastener. Tighten only enough to secure it. The board should lie flat without bending.
- Restore the specified thermal arrangement. Put any original shield or pad back as shown. Check that the cover will fit without pressure from a tall cooler or misplaced material.
A drive that sits crooked or remains visibly above the standoff is not ready to secure. Verify the socket engagement and supported length. A slightly loose drive can prevent detection even if the connector appears to hold it when you look down from above.
Check that no screw or loose part remains inside the laptop. Reconnect the battery according to the model instructions and restore the bottom cover and its screws.
Connect external power as the model requires for the first start. Bring the machine back to its ordinary state before testing Windows.
How do you bring the new SSD online in Windows?
Verify that the laptop boots from its existing SSD
Start the laptop and let it boot to the normal Windows installation. A request for a BitLocker recovery key should be handled through the normal Microsoft or organization recovery route using the matching key. Do not make unrelated firmware or boot changes to try to bypass it.
Confirm that your original files and Windows drive are present. Then open Disk Management as an administrator. Look for a new physical disk and confirm its capacity and identity against the SSD you installed.
Do not assume it is Disk 1 or another particular number. A computer with additional drives may number them differently.
A new disk can be visible in Disk Management while File Explorer has no new drive letter. An unallocated or uninitialized drive typically needs the next steps before it can store files. If the new device already contains partitions, check whether you bought a used drive or inserted a different drive than you expected.
Initialize only the verified new blank disk
- Identify the blank new disk. Compare its capacity and model details with the drive you installed. Leave the existing Windows and recovery partitions alone.
- Initialize as GPT if required. GPT is the ordinary modern choice for a new secondary drive on Windows. If the drive already has a partition table, decide whether it contains anything you need before using a destructive operation.
- Create a New Simple Volume. Select the new disk’s unallocated space, choose the volume size and an available drive letter, and use NTFS for a standard Windows game or data drive.
- Confirm the volume. Open File Explorer, verify the letter and capacity, then create and reopen a small test file.
The Initialize Disk and formatting steps are for the correct blank SSD. If any existing data might matter, stop and verify the disk before writing anything. A clear label such as Games or Projects makes it easier to find the new drive without confusing it with the Windows disk later.
Move a library only after the new volume works
Use the supported storage controls in the game launcher if you want to move existing installations. For a new library, choose the new drive and test a small install or game move before transferring everything. Keep a copy of important documents separately if the extra drive will hold files as well as games.
Copy and reopen several files, then restart and verify that the volume stays available. If a launcher loses the library after a drive-letter change, set a stable letter and use the launcher’s supported library settings to find it again. The storage task is complete when the installed SSD remains accessible from normal restarts and everyday use.
What should you check if the new SSD is missing?
Follow the symptom from Windows back to the hardware
If File Explorer cannot see it but Disk Management shows the correct drive as unallocated, check the volume and letter before opening the laptop again. If Disk Management does not see it, check whether the model’s firmware storage information lists it where that feature is available. A BIOS screen can vary by model and may not show every device in the same menu.
Keep controller settings and boot mode as they were. Changing RAID, VMD, or storage mode can affect access to the original Windows installation.
Adding a data drive normally does not require changing those options. If the operating system lacks a driver for a documented storage controller, follow MSI’s guidance for the exact model rather than guessing.
If the drive is missing across the available checks, shut down and repeat the documented isolation process before reseating it. Verify the connector, standoff, clearance, and compatible interface. If the same known-compatible SSD still fails to appear after a careful reseat, document its model and the slot and contact MSI support.
How do you verify the upgrade before moving your whole library?
Compare disk capacity and identity before formatting
A drive’s reported capacity can look smaller than the retail number because the drive maker and operating system can use different units. A nominal 1 TB drive is roughly 931 GiB before normal partition and formatting differences.
Treat capacity as one identification clue. Two drives of the same advertised size need another check, such as the model name or the change in the physical disk list.
If all you can see are two similar sizes, compare with the screenshot or notes you took before opening the laptop. Use drive properties or an available system inventory view to confirm the identity.
If you cannot tell the disks apart, stop before choosing Initialize or Format. A working copy of your files matters more than saving a few minutes during setup.
Handle offline, formatted, and missing volumes as different cases
If the new disk is listed as Offline, identify it and use the appropriate bring-online option if available. Then check its status again. A new blank disk may need initialization and a simple volume.
A disk with an existing filesystem may only need a drive letter. Reformatting an existing volume would erase its contents.
If the disk has a healthy usable volume but no letter, check the volume’s drive-letter options in Disk Management. Use an available letter and verify it opens normally.
If it contains an unfamiliar or encrypted partition, identify the data and source first. A used drive can carry information the seller or previous owner left behind.
If the model’s firmware shows the new drive and Windows still does not, record the drive model, the firmware entry, and any controller or device warning visible in Windows. Check the exact model’s support drivers and storage guidance. Keep the current Windows boot configuration intact while investigating the data SSD.
Check normal behavior before moving important files
Copy a sample set of files or install a small game. Reopen it from the new volume, restart, and verify that the drive appears again.
This catches recognition or drive-letter issues before a large move. When moving a library, use the launcher’s supported move or repair tools so its index reflects the new path.
Try a normal sustained workload after confirming the drive is fitted correctly. If the new volume disappears under use or shows repeated read or write errors, stop moving data to it.
Check the manufacturer’s diagnostic information, supported thermal arrangement, and connection. Keep the backup and record which task reproduced the problem.
Know what to do if the original Windows drive stops booting
Stop before initializing, repairing, or reformatting anything if the laptop no longer boots as expected. Recheck the work you just carried out and verify whether the original SSD and its connector were undisturbed.
Follow the model’s power and battery procedure before opening it again. Keep the recovery key available if the Windows boot path asks for it.
If you need to isolate the fault and are comfortable doing so under the model guide, return the hardware to its original storage configuration by removing only the SSD you added. Confirm whether the laptop starts normally again. If it still fails, seek support with the exact model and the steps you took rather than changing a firmware controller mode.
What if Windows already shows more than one drive letter?
Check the numbered disk entries in the lower pane of Disk Management. C: and D: can be two partitions on the same physical disk, so their presence alone cannot tell you whether the laptop has an empty M.2 slot. Likewise, a physically installed drive can exist without an assigned letter or usable volume.
If the model has two slots and both are occupied, decide which existing drive or files need to stay available before buying another internal SSD. Replacing an occupied drive is a separate project that can require migrating its data or operating system. If you need additional game space immediately, an external SSD is another option if your laptop has a suitable port.
If the free slot is rated for a different PCIe generation from the boot slot, choose the new drive for the slot you will actually use. Leave the boot SSD in its original position for this upgrade.
Conclusion
Confirm the exact MSI Vector model and a vacant compatible M.2 NVMe slot. Back up the computer, follow that model’s opening and battery instructions, and keep the existing boot SSD installed. Once the new drive is recognized, initialize only that blank disk in Windows and verify the new volume after a restart.